Printables.com
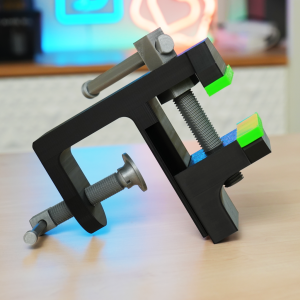
Tornillo de Banco | Table Clamp
🏭 100+ tiskáren
·
across Czechia
·
⏱ pay after printer accepts
Model author: Control 3D
·
original on Printables.com
Description
Este diseño es uno de los ejercicios de nuestro nuevo curso de diseño 3D avanzado con Fusion. Info del curso aquí https://control3d.net/curso-de-diseno-3d-fusion-nivel-intermedio/
Suscríbete aquí https://control3d.net/registrate/
Tornillo de Banco - Ajustes de impresión
Este tornillo de banco ha sido diseñado para imprimirse, sin soportes, y con las roscas tumbadas para tener la mayor fuerza posible.
Lo más recomendable es imprimirlo al menos en PETG, con 4 paredes, y un relleno del 30%, para que tenga la fuerza suficiente como para ser funcional.
Los protectores de mordaza están impresos en TPU 95A. El modelo tiene tolerancias aplicadas en diseño, aunque siempre teniendo en cuenta las tolerancias y el calibrado óptimo del filamento.
Parámetros de impresión recomendados:
• Material: PETG o ABS/ASA y TPU
• Boquilla: 0,4
• Altura de capa: 0,2
• Perímetros: De 4 a 6
• Relleno: 30 a 50%
Montaje
• Introducimos el tornillo de apriete en la base.
• Ponemos la contrarresta haciendo de cierre en el tornillo de apriete
• Colocamos la mordaza móvil sobre la cola de milano de la base, mientras enroscamos el tornillo de apriete
• Enroscamos el tornillo de ajuste
• Colocamos a presión el plato de ajuste
• Introducimos las palancas en sus respectivos huecos, y colocamos los tapones que los aseguran
• Colocamos los protectores de las mordazas
Bench Vise - Print Settings
This bench vise has been designed to be printed without supports, with the threads lying flat to achieve the greatest possible strength.
It is highly recommended to print it at least in PETG, with 4 walls and 30% infill, so that it is strong enough to be functional.
The jaw covers are printed in TPU 95A. The model has tolerances applied in the design, while always keeping in mind the filament's tolerances and optimal calibration.
Recommended Print Parameters:
• Material: PETG or ABS/ASA and TPU
• Nozzle: 0.4 mm
• Layer Height: 0.2 mm
• Walls: 4 to 6
• Infill: 30 to 50%
Assembly
• Insert the clamping screw into the base.
• Place the retaining ring onto the clamping screw to secure it.
• Position the moving jaw onto the base's dovetail slide while screwing in the clamping screw.
• Screw in the adjustment screw.
• Press-fit the adjustment knob into place.
• Insert the handles into their respective holes and insert the caps to secure them.
• Attach the jaw protectors
Similar models
from 200 Kč