Printables.com
Female Statue Headphone Stand, Renaissance Style
🏭 100+ tiskáren
·
across Czechia
·
⏱ pay after printer accepts
Model author: PolygonBronson
·
original on Printables.com
Description
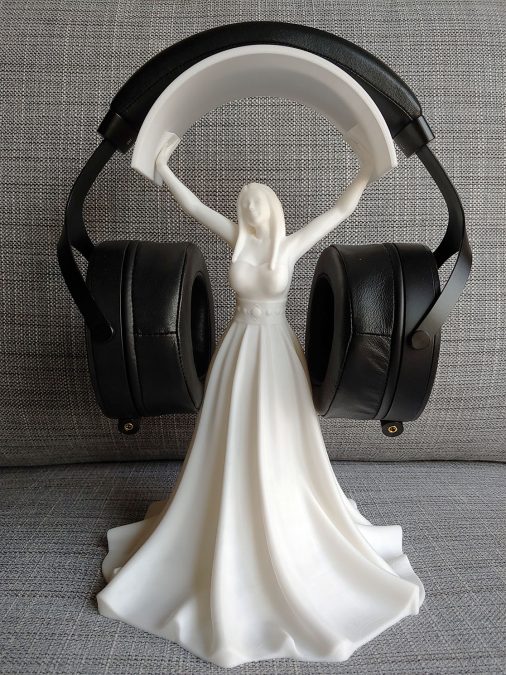
Here is a statue headphone stand that was inspired by the classic marble sculptures of the renaissance. When I had the idea for this I couldn't find anything online that was similar, so I made it myself. This probably wouldn't be a good stand for a high-clamp headphone since the pads would dig into the arms/dress. It's also sized for large, over ear headphones. The headphones pictured is a Monolith M1070 (fully extended).
The stand is in 3 different pieces, all in PLA, both to fit my printer and print most optimally. The pieces are the headband rest bow (the curved top part), top, and bottom, with pegs/holes for putting them together. Tolerances were good enough on my Ender 3 V2 that that they fit as printed (YMMV), but they could wobble a bit, especially where the top and bottom section meet so I used some gel super glue to make everything more stable.
I also split it into 3 pieces to minimize the supports and so the bow could be printed the strong way (on the edge). I used a brim for the bow and top pieces to make sure they didn't come off while printing. The bottom is so huge build plate adhesion shouldn't be a problem.
The headband rest needs build plate supports, but just for the hand blocks. You don't need them for the holes in said blocks. I printed this piece at 0.2mm and 15% infill.
The top needs build plate supports for the end of the hair and her left breast (this one isn't strictly necessary, I think) and if printed at 0.12mm it can print everything else, including the arms (it's right at the max 59 degrees that Cura allows) without supports which saves loads of plastic. I think I printed this piece at 15%, but you could get away with less, I just wanted it to fill solid. Don't crank the printing speed too high or the fingers and other small details might fail. I had some stringing and blobbing on the fingers and had to do some finish work to clean those up.
The bottom will take a loooooooong time to print no matter what settings you use. This piece took me 26 hours at 75mm print speed. I used the adaptive layer setting in Cura that ranged from 0.12mm to 0.28mm (0.2 + or - 0.08mm in 0.04mm steps). This helps the speed of printing the middle section but makes sure the curves at the bottom and details on the belt are nice and fine. I did line infill of 5% but you could save plastic printing but using like a 10% lightning pattern but it would be very hollow-sounding which I was trying to avoid.
Definitely not a print for the faint of heart, but it's a pretty cool conversation piece when it's done! :)
Similar models
from 310 Kč