Unknown source
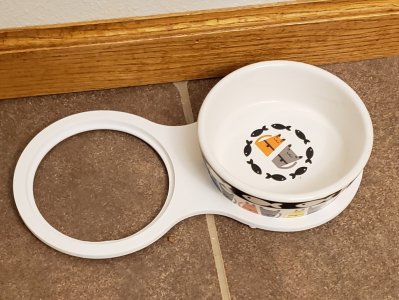
A1 mini Purge Bucket Bin Poop Management System
🏭 100+ tiskáren
·
across Czechia
·
⏱ pay after printer accepts
Description
NOTE:
• Please read the instruction guide below.
• Download the 3mf file if you are using a Bambu slicer. Download the stl if you are using other slicers.
• I do my best to double-check and test the print profiles I created. They are up to date with whatever changes I make. If you are using profiles made by others, please check if they are updated.
UPDATE 24 Nov 2023
Previous writeup - “…One of the ideas was to attach a bin/basket on the end of the cantilever x-axis. But based on experience with cantilever printers, it is never a good idea to hang a bin/basket at the extreme end of the X-axis extrusion, regardless of how robust the Z-axis linear rail is… ”
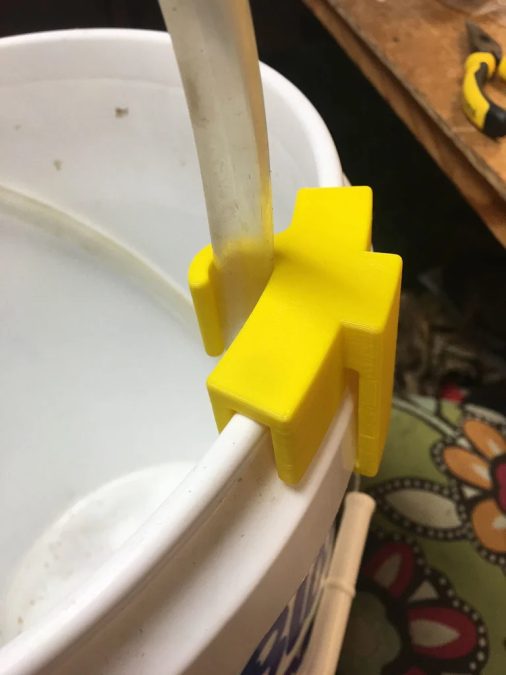
I was not entirely right. While hanging a bin/basket at the end of a cantilever was never a good idea, attaching a lightweight guide/baffle is a very good idea. I looked at the designs by others and CAD what I think is a combination of what was good. Together with a shorter bin, I added Option 3 - Short Bin with Pruge Guide. I have updated this project's 3mf file.
The short bin uses the same magnetic docking system. So you will still need to print the magnetic docks D1 (plate 1).
In addition, I have also increased the capacity of the bin without an increase in footprint.
This is the first of three designs by Thrutheframe for A1 mini. The 3 essential printable accessories that you will need for your new printer.
• A1 mini Poop Management System (PMS)
• A1 mini Build Plate Stand
• A1 mini Scraper and Stylus Holder
While the hardware for all 3 builds can be self-sourced, I am working with Veetec3D to offer an A1 mini Hardware Kit for all the 3 builds above. It will include the 6x3mm magnets, M3 screws, VHB, thin double-sided tapes, and pre-cut self-adhesive anti-slip pads. Printed parts are not included.
The price is 10€ with tracked shipping at 5€. We try our best to keep the pricing affordable for everyone to have easy access to the required hardware for all 3 builds. In addition, parts and labour are sourced within EU. If you like the designs by ThrutheFrame and wish to support his projects, do consider buying this kit. A small royalty will go towards funding project consumables ie. filaments, materials, electricity, coffee, time, software subscription, etc
INTRODUCTION
While unboxing my A1 mini combo, I noticed it needs a Poop Management System (PMS) to collect the filament poop during purging.
The simple yet futuristic design of the A1 mini fuels my imagination and hence, my design for the PMS takes on the look and feel of a space station and docking bay.
As the A1 mini may be the user's first 3D printer, I set up a few parameters when designing PMS:
• Aesthetically pleasing (to me), Easy to print/assemble and Fun to use.
• Optimize print time and filament usage
• Must fit onto the A1 build plate of 180x180x180mm
• Will not cause accidental purge clogging
• No support needed
• Printed in PLA.
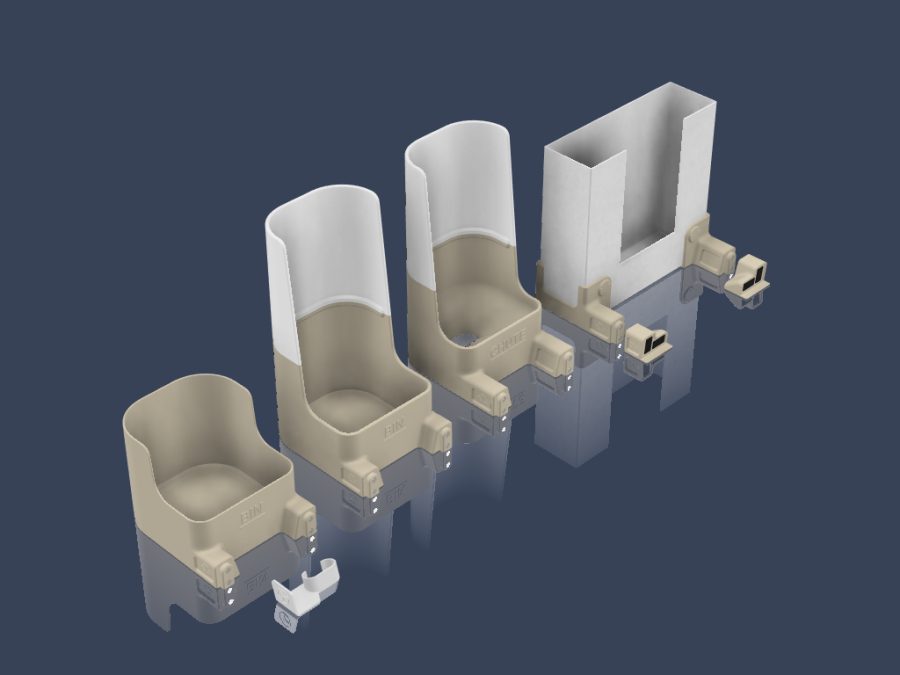
There are 3 PMS options:
• Option 1 - An eco-friendly design using the filament cardboard box as a ReCycle PMS.
• Option 2A - A fully printed Bin
• Option 2B - For users who print extensively, a printed Chute to guide the poop down into your regular waste bin
• Option 3 - A short bin with a purge guide/baffle that is attached to the purge wiper (recommended)
You will need to print a pair of docking bays (D-1) which the PMS will be connected to the A1 mini printer.
All the above PMS are magnetically attached with Ø6x3 magnets to the D-1 docking bays.
The D-1 will be secured to the A1 mini printer using VHB tapes (or similar mounting tape that is 1mm in thickness).
BOM
• Ø6x3 magnets - 8pcs
• 1mm VHB tape (10x20mm) - 4pcs
• Thin double-sided tape - For ReCycle Bin only
** Note that the VHB tape (or any double-sided tape) has to be 1mm thick. This is because the recess I made is 0.8mm, allowing the dock to flush with the printer.
INSTRUCTIONS
Download the 3mf file. The settings are prepared for printing PLA on an A1 mini. If you are printing on a different printer, please make the necessary changes to the settings.
The STLs are also available in folders.
I designed the parts based on 0.4mm nozzle and 0.2mm layer height. Print in 0.2mm layer height for accuracy.
Print plate 1 - Docking bracket. Both front and back docking brackets are required.
Print either Option 1, 2A/2B or 3 depending on the configuration you want.
If you are using Option 2A/2B. You will need to print plate 3 - Shield top.
If you are using Option 3, you will need to print plates 6 & 7
Docking Bracket (D-1)
• Press fit the Ø6x3mm magnets into the docking bracket. The holes are designed for press fitting, hence they are tight-fitting. Please ensure that the polarity of all the magnet are facing in the same direction.
• Paste the VHB tapes onto the docking bracket.
Option 1 - ReCycle Bin
• Press fit the Ø6x3mm magnets into the ReCycle
Similar models

from 350 Kč


from 260 Kč