Cults3D.com
Spool winder v3
🏭 100+ tiskáren
·
po celé ČR
·
⏱ platba po přijetí tiskárnou
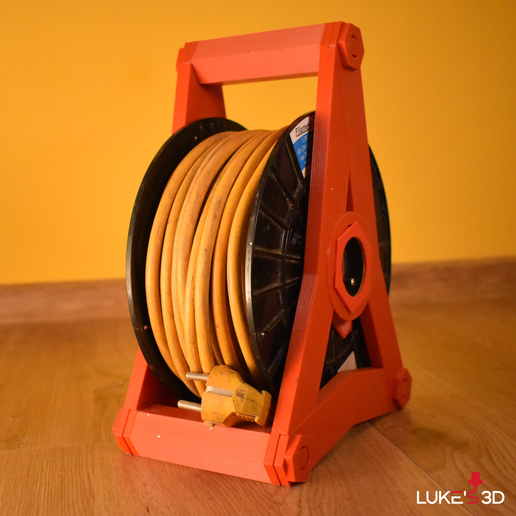
Autor modelu: Lukes3D
·
originál na Cults3D.com
Popis
Hi guys,
if you wonder what to do with empty spools here's my 3rd iteration of Spool winder (see previous version [here] (https://www.printables.com/model/5114-spool-winder-v1v2)). This winder works with empty 1kg spools from PM (Plasty Mladeč) and can hold up to 20m of cord. Max.outer plug diameter is 46,5 mm.
**EDIT:** I added .STEP files for all components, feel free to modify!
## Goals:
- fully 3D printable
- all parts can be 3D printed on 22x22 cm bed
- sturdy and functional design
- use as few supports as possible
- duplicate as many parts as possible
- nice design
## Improvements
- new hexagonal rods which are printed horizontally to improve stifness
- reduced number of parts including removed shaft washer and adapter cap
- revised design of socket adapter ensures better printability, less used material providing same functionality as before
- new polygonal design
- easier to print shaft screw
## Bill of materials
- 3x Rod
- 6x Nut
- 4x Side
- 2x Bottom
- 1x Adapter screw
- 1x Adapter
- 1x Socket spool adapter
- 1x Socket ring
- 1x Shaft bolt
- 1x Shaft nut
- 1x Shaft washer
- 1x Handle
- 1x Bearing
## Printing instructions
I recommend using PETG and I will mention only some parts here as other are trivial:
- Rod - print horizontally with supports
- Side, Bottom - unfortunately you have to use supports
- Adapter - print horizontally with supports
- Shaft bolt - print horizontally with supports
## Assembly
Firstly, disassemble the spool. You can have a look at how I do this in v1 assembly video:
https://youtu.be/VXvynGzOpbQ
Next take Adapter, Socket ring and Socket spool adapter and put them together. Take two sides and click them around Socket ring. Now you can place the Bottom in place, insert three rods a secure them using Nuts. Take knife or saw and cut away section so that wire can run thought the center of the spool. On the other half of spool screw on Spool adapter using Spool adapter bolt. Put Shaft bolt through, place Shaft washer and Bearing on top. Handle comes next and once in place secure it with Shaft nut. Now you can marry the two spool halfs together, align Sides and Rods and click the spool into place.
And you're done!
See assembly tutorial here:
https://youtu.be/brvriV_PVi8
Cheers!
If you like mechanical designs follow me for more or check out my Gear clock:
[creation gear-clock-lukes3d]
or check out another upcycling project of mine:
[creation pm-spool-bird-feeder]
#UPCYCLINGFIVERR
Luke
Podobné modely